2016년 9월 19일 월요일

프로젝트 Github 연동 .gitignore 설정 및 업데이트

1. 해당 프로젝트 root 폴더에서 오른쪽 버튼 클릭후 git bash here을 클릭한다.


2. vi .gitignore 명령어 입력한다.

3. 아무내용 입력후 esc 누르고 :wq 를 입력한다. ( 저장하고 종료 명령어 )

4. 메모장으로 파일을 열어 수정한다.


# Directories #
/build/
/bin/
target/
.idea
classes/
META-INF/
  
# OS Files #
.DS_Store
  
*.class
  
# Package Files #
*.jar
*.war
*.ear
*.db
  
######################
# Windows
######################
  
# Windows image file caches
Thumbs.db 
  
# Folder config file
Desktop.ini
  
######################
# OSX
######################
  
.DS_Store
.svn
  
# Thumbnails
._*
  
# Files that might appear on external disk
.Spotlight-V100
.Trashes
  
  
######################
# Eclipse
######################
  
*.pydevproject
.project
.metadata
bin/**
tmp/**
tmp/**/*
*.tmp
*.bak
*.swp
*~.nib
.classpath
.settings/
.loadpath
/src/main/resources/rebel.xml
# External tool builders
.externalToolBuilders/
  
# Locally stored "Eclipse launch configurations"
*.launch
  
# CDT-specific
.cproject
  
# PDT-specific
.buildpath

# Created by https://www.gitignore.io/api/intellij

### Intellij ###
# Covers JetBrains IDEs: IntelliJ, RubyMine, PhpStorm, AppCode, PyCharm, CLion, Android Studio and Webstorm
# Reference: https://intellij-support.jetbrains.com/hc/en-us/articles/206544839

# User-specific stuff:
.idea/**/workspace.xml
.idea/**/tasks.xml
.idea/dictionaries

# Sensitive or high-churn files:
.idea/**/dataSources/
.idea/**/dataSources.ids
.idea/**/dataSources.xml
.idea/**/dataSources.local.xml
.idea/**/sqlDataSources.xml
.idea/**/dynamic.xml
.idea/**/uiDesigner.xml

#ignore
*.iml

# Gradle:
.idea/**/gradle.xml
.idea/**/libraries

# CMake
cmake-build-debug/

# Mongo Explorer plugin:
.idea/**/mongoSettings.xml

## File-based project format:
*.iws

## Plugin-specific files:

# IntelliJ
/out/

# mpeltonen/sbt-idea plugin
.idea_modules/

# JIRA plugin
atlassian-ide-plugin.xml

# Cursive Clojure plugin
.idea/replstate.xml

# Crashlytics plugin (for Android Studio and IntelliJ)
com_crashlytics_export_strings.xml
crashlytics.properties
crashlytics-build.properties
fabric.properties

### Intellij Patch ###
# Comment Reason: https://github.com/joeblau/gitignore.io/issues/186#issuecomment-215987721

# *.iml
# modules.xml
# .idea/misc.xml
# *.ipr

# Sonarlint plugin
.idea/sonarlint

# End of https://www.gitignore.io/api/intellij


5. 완료.

* git 사용도중에 gitignore 설정시 다음과 같이 실행하면 적용된다.
* git ignore 파일을 commit 한 후 아래와 같이 명령어를 실행한다.

$ git rm -r --cached .
$ git add .
$ git commit -m "git ignore add"
$ git push


관련사이트

Share:

2016년 9월 2일 금요일

스프링(Spring) 개발하기 - (5) 스프링 설정파일

1. pom.xml 수정


2. index.jsp 추가


2-1. webapp 폴더에 index.jsp 를 생성한다.


2-2. index.jsp 소스를 수정한다.

<body>
 <h3>index page</h3>
</body>

2-3. web.xml 에서 index.jsp 설정을 추가한다.

<web-app version="3.0" xmlns="http://java.sun.com/xml/ns/javaee"
xmlns:xsi="http://www.w3.org/2001/XMLSchema-instance"
xsi:schemaLocation="http://java.sun.com/xml/ns/javaee http://java.sun.com/xml/ns/javaee/web-app_3_0.xsd">
 
 <welcome-file-list>
       <welcome-file>index.jsp</welcome-file>
 </welcome-file-list>

2-4. Server 실행후 http://localhost:8080/프로젝트이름/ 주소창에 입력한다.


3. Servlet 설정 변경


web.xml 파일을 열고

<servlet>
    <servlet-name>appServlet</servlet-name>
    <servlet-class>org.springframework.web.servlet.DispatcherServlet</servlet-class>
    <init-param>
        <param-name>contextConfigLocation</param-name>
        <param-value>/WEB-INF/spring/appServlet/servlet-context.xml</param-value>
    </init-param>
    <load-on-startup>1</load-on-startup>
</servlet>
    
<servlet-mapping>
    <servlet-name>appServlet</servlet-name>
    <url-pattern>/</url-pattern>
</servlet-mapping>
를 다음과 같이 변경한다.

<servlet>
        <servlet-name>action</servlet-name>
        <servlet-class>
            org.springframework.web.servlet.DispatcherServlet
        </servlet-class>
        <init-param>
            <param-name>contextConfigLocation</param-name>
            <param-value>
                /WEB-INF/config/*-servlet.xml 
            </param-value>
        </init-param>
        <load-on-startup>1</load-on-startup>
</servlet>
<servlet-mapping>
        <servlet-name>action</servlet-name>
        <url-pattern>*.do</url-pattern>
</servlet-mapping>


4. contextConfigLocation 변경


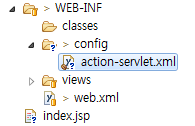
4-1. WEB-INF 폴더 밑에 config 폴더를 생성후 servlet-context.xml을 복사해서 action-servlet.xml 로 이름을 변경한다. spring 폴더는 삭제한다.


4-2. web.xml 소스를 수정한다.


<servlet>
        <servlet-name>action</servlet-name>
        <servlet-class>
            org.springframework.web.servlet.DispatcherServlet
        </servlet-class>
        <init-param>
            <param-name>contextConfigLocation</param-name>
            <param-value>
                /WEB-INF/config/*-servlet.xml 
     </param-value>
        </init-param>
 <load-on-startup>1</load-on-startup>
</servlet>

5. UTF-8 설정


web.xml에 추가한다.


<filter>
    <filter-name>encodingFilter</filter-name>
<filter-class>
        org.springframework.web.filter.CharacterEncodingFilter
</filter-class>
<init-param>
    <param-name>encoding</param-name>
    <param-value>utf-8</param-value>
</init-param>
</filter>
<filter-mapping>
    <filter-name>encodingFilter</filter-name>
<url-pattern>*.do</url-pattern>
</filter-mapping>

6. 기타 설정

기존 contextConfigLocation 설정을 수정한다.

<context-param>
 <param-name>contextConfigLocation</param-name>
 <param-value></param-value>
</context-param>

7. 최종 web.xml


<web-app version="3.0" xmlns="http://java.sun.com/xml/ns/javaee"
xmlns:xsi="http://www.w3.org/2001/XMLSchema-instance"
xsi:schemaLocation="http://java.sun.com/xml/ns/javaee http://java.sun.com/xml/ns/javaee/web-app_3_0.xsd">
 
 <welcome-file-list>
             <welcome-file>index.jsp</welcome-file>
        </welcome-file-list>
    
 <!-- The definition of the Root Spring Container shared by all Servlets and Filters -->
 <context-param>
  <param-name>contextConfigLocation</param-name>
  <param-value>classpath*:config/spring/context-*.xml</param-value>
 </context-param>
 
 <!-- Creates the Spring Container shared by all Servlets and Filters -->
 <listener>
  <listener-class>org.springframework.web.context.ContextLoaderListener</listener-class>
 </listener>

 <!-- Processes application requests -->
 <servlet>
        <servlet-name>action</servlet-name>
        <servlet-class>
            org.springframework.web.servlet.DispatcherServlet
        </servlet-class>
        <init-param>
            <param-name>contextConfigLocation</param-name>
            <param-value>
                /WEB-INF/config/*-servlet.xml 
         </param-value>
         </init-param>
         <load-on-startup>1</load-on-startup>
 </servlet>
 <servlet-mapping>
         <servlet-name>action</servlet-name>
         <url-pattern>*.do</url-pattern>
 </servlet-mapping>
 
 <filter>
     <filter-name>encodingFilter</filter-name>
 <filter-class>
         org.springframework.web.filter.CharacterEncodingFilter
 </filter-class>
 <init-param>
     <param-name>encoding</param-name>
     <param-value>utf-8</param-value>
 </init-param>
 </filter>
 <filter-mapping>
     <filter-name>encodingFilter</filter-name>
 <url-pattern>*.do</url-pattern>
 </filter-mapping>

</web-app>
Share:

2016년 9월 1일 목요일

이클립스(Eclipse) 프로젝트 Github 연동

0. https://git-scm.com/downloads 에서 git을 설치한다.

1. https://github.com/ 에서 계정을 만든다.

2. repository 를 생성하고 주소를 복사한다.

3. 해당 프로젝트 우클릭 하고 Team > Share Project 선택한다.


4. Use or create repository in parent folder of project 체크박스를 선택하고 Finish 버튼을 클릭한다.


5. 해당 프로젝트 폴더에서 빈곳에 오른쪽 버튼을 클릭하고 Git Bash Here 클릭한다.


6. Git Bash에서 해당 명령어 2개를 입력한다.

  • git config --global user.name "유저이름" 
  • git config --global user.email "UserMail@youremail.com" 


7. 해당 프로젝트 우클릭 하고 Team > Add to Index 선택한다.

8. 해당 프로젝트 우클릭 하고 Team > Commit 선택한다.

9. URI에 git에서 생성한 repository 주소를 입력하고 User / Password ( Github계정)  를 입력하고 Finish 버튼을 클릭한다.

10. 자신의 GitHub주소로 들어가 업로드 되었는지 확인한다.


Share:

스프링(Spring) 개발하기 - (4) 스프링 프로젝트 생성

1.  스프링 프로젝트 생성


1-1. File > New > Other 를 선택한다.

1-2. Spring > Spring Legacy Project를 선택하고 Next 버튼을 클릭한다.


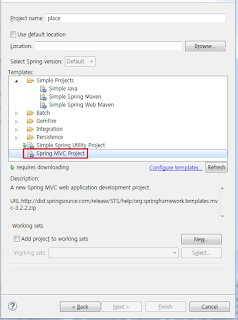
1-3. Project name을 입력하고 Spring MVC Project를 선택하고 Next를 클릭한다.


1-4. 3레벨 이상 형식으로 package명을 입력하고 Finish 버튼을 클릭한다.


1-4. 스프링 프로젝트 생성 완료


2. 프로젝트 실행


1. Server 시작후 주소창에 http://localhost:8080/프로젝트네임/ 을 입력한다.


Share: